Lập trình cho ESP32 WROOM
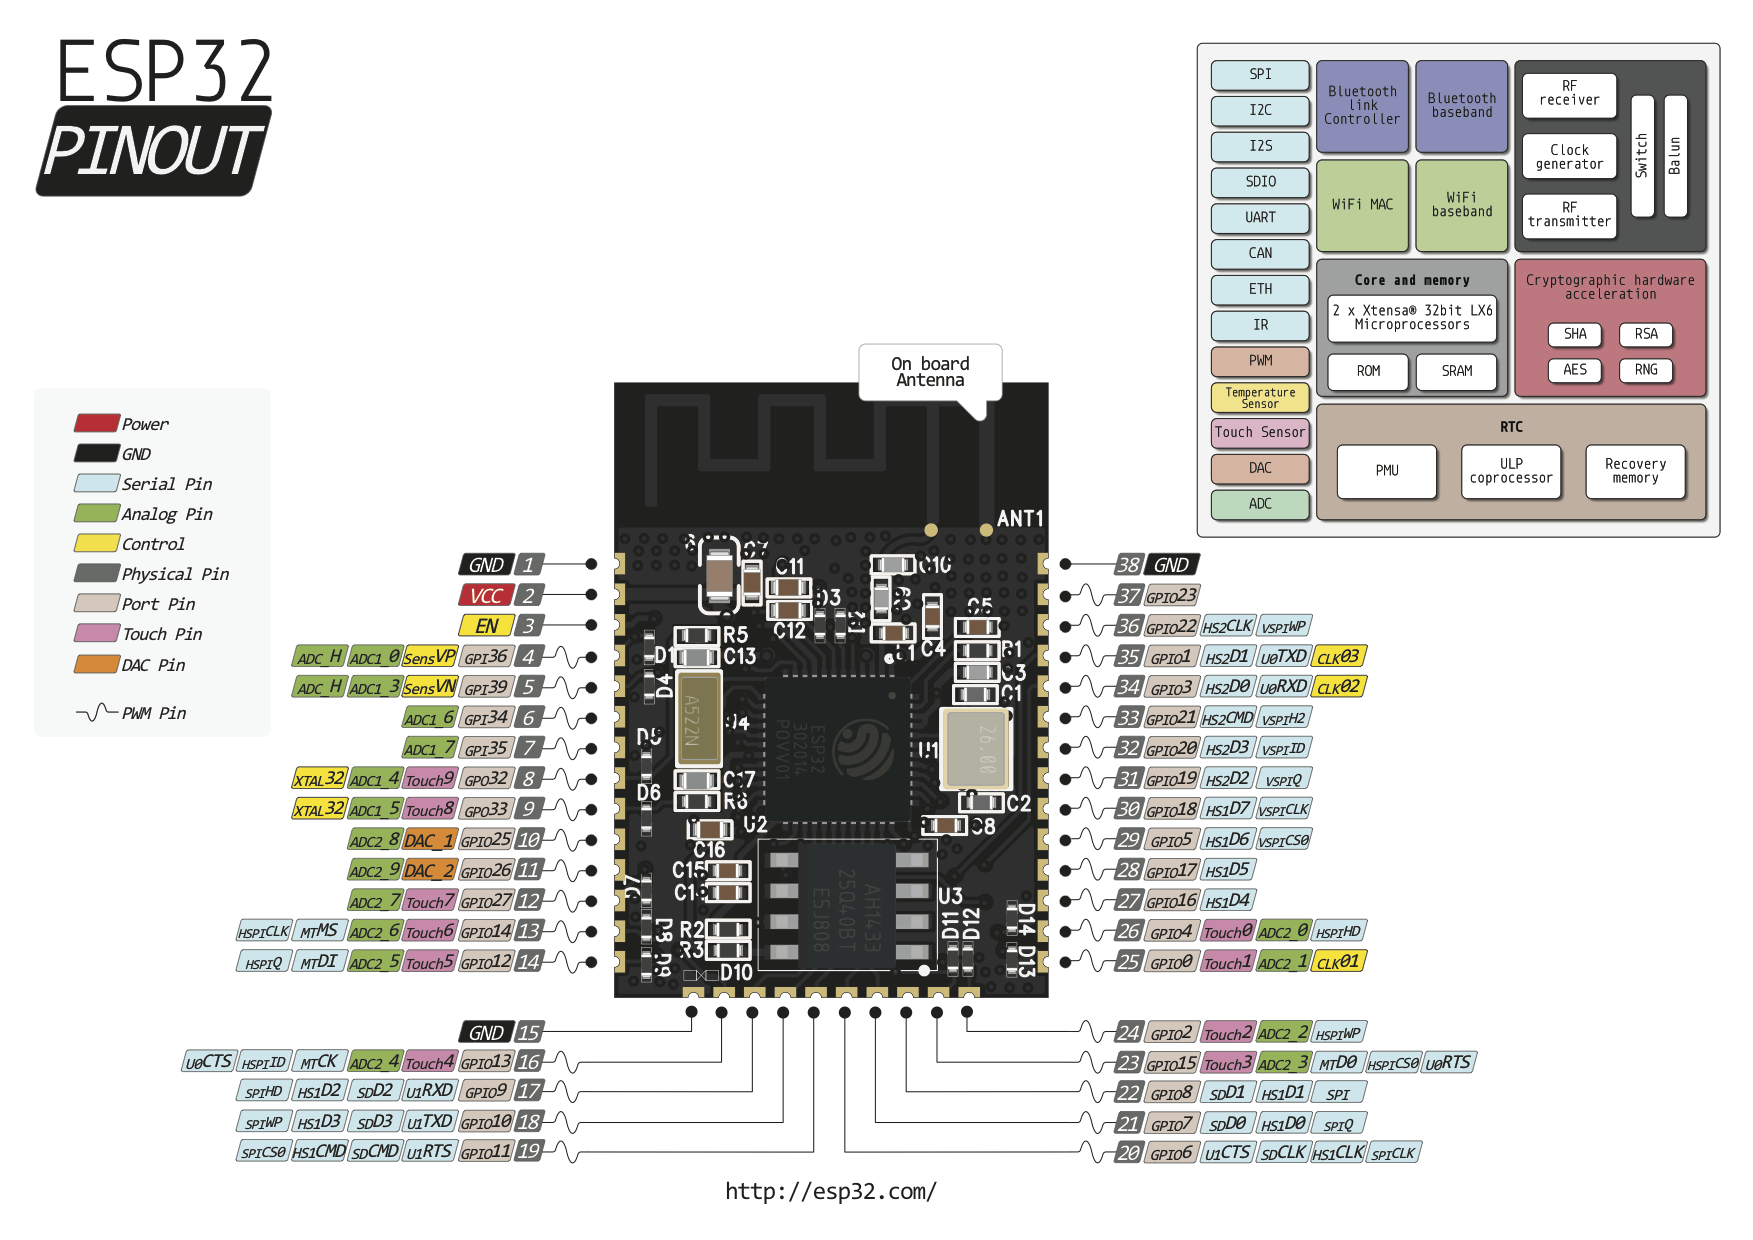
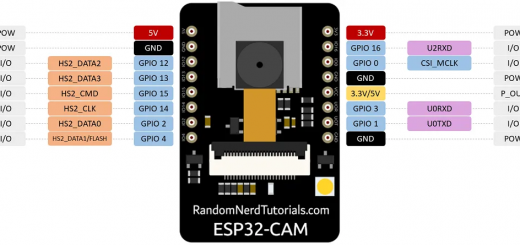
Board mạch ESP32 WROOM
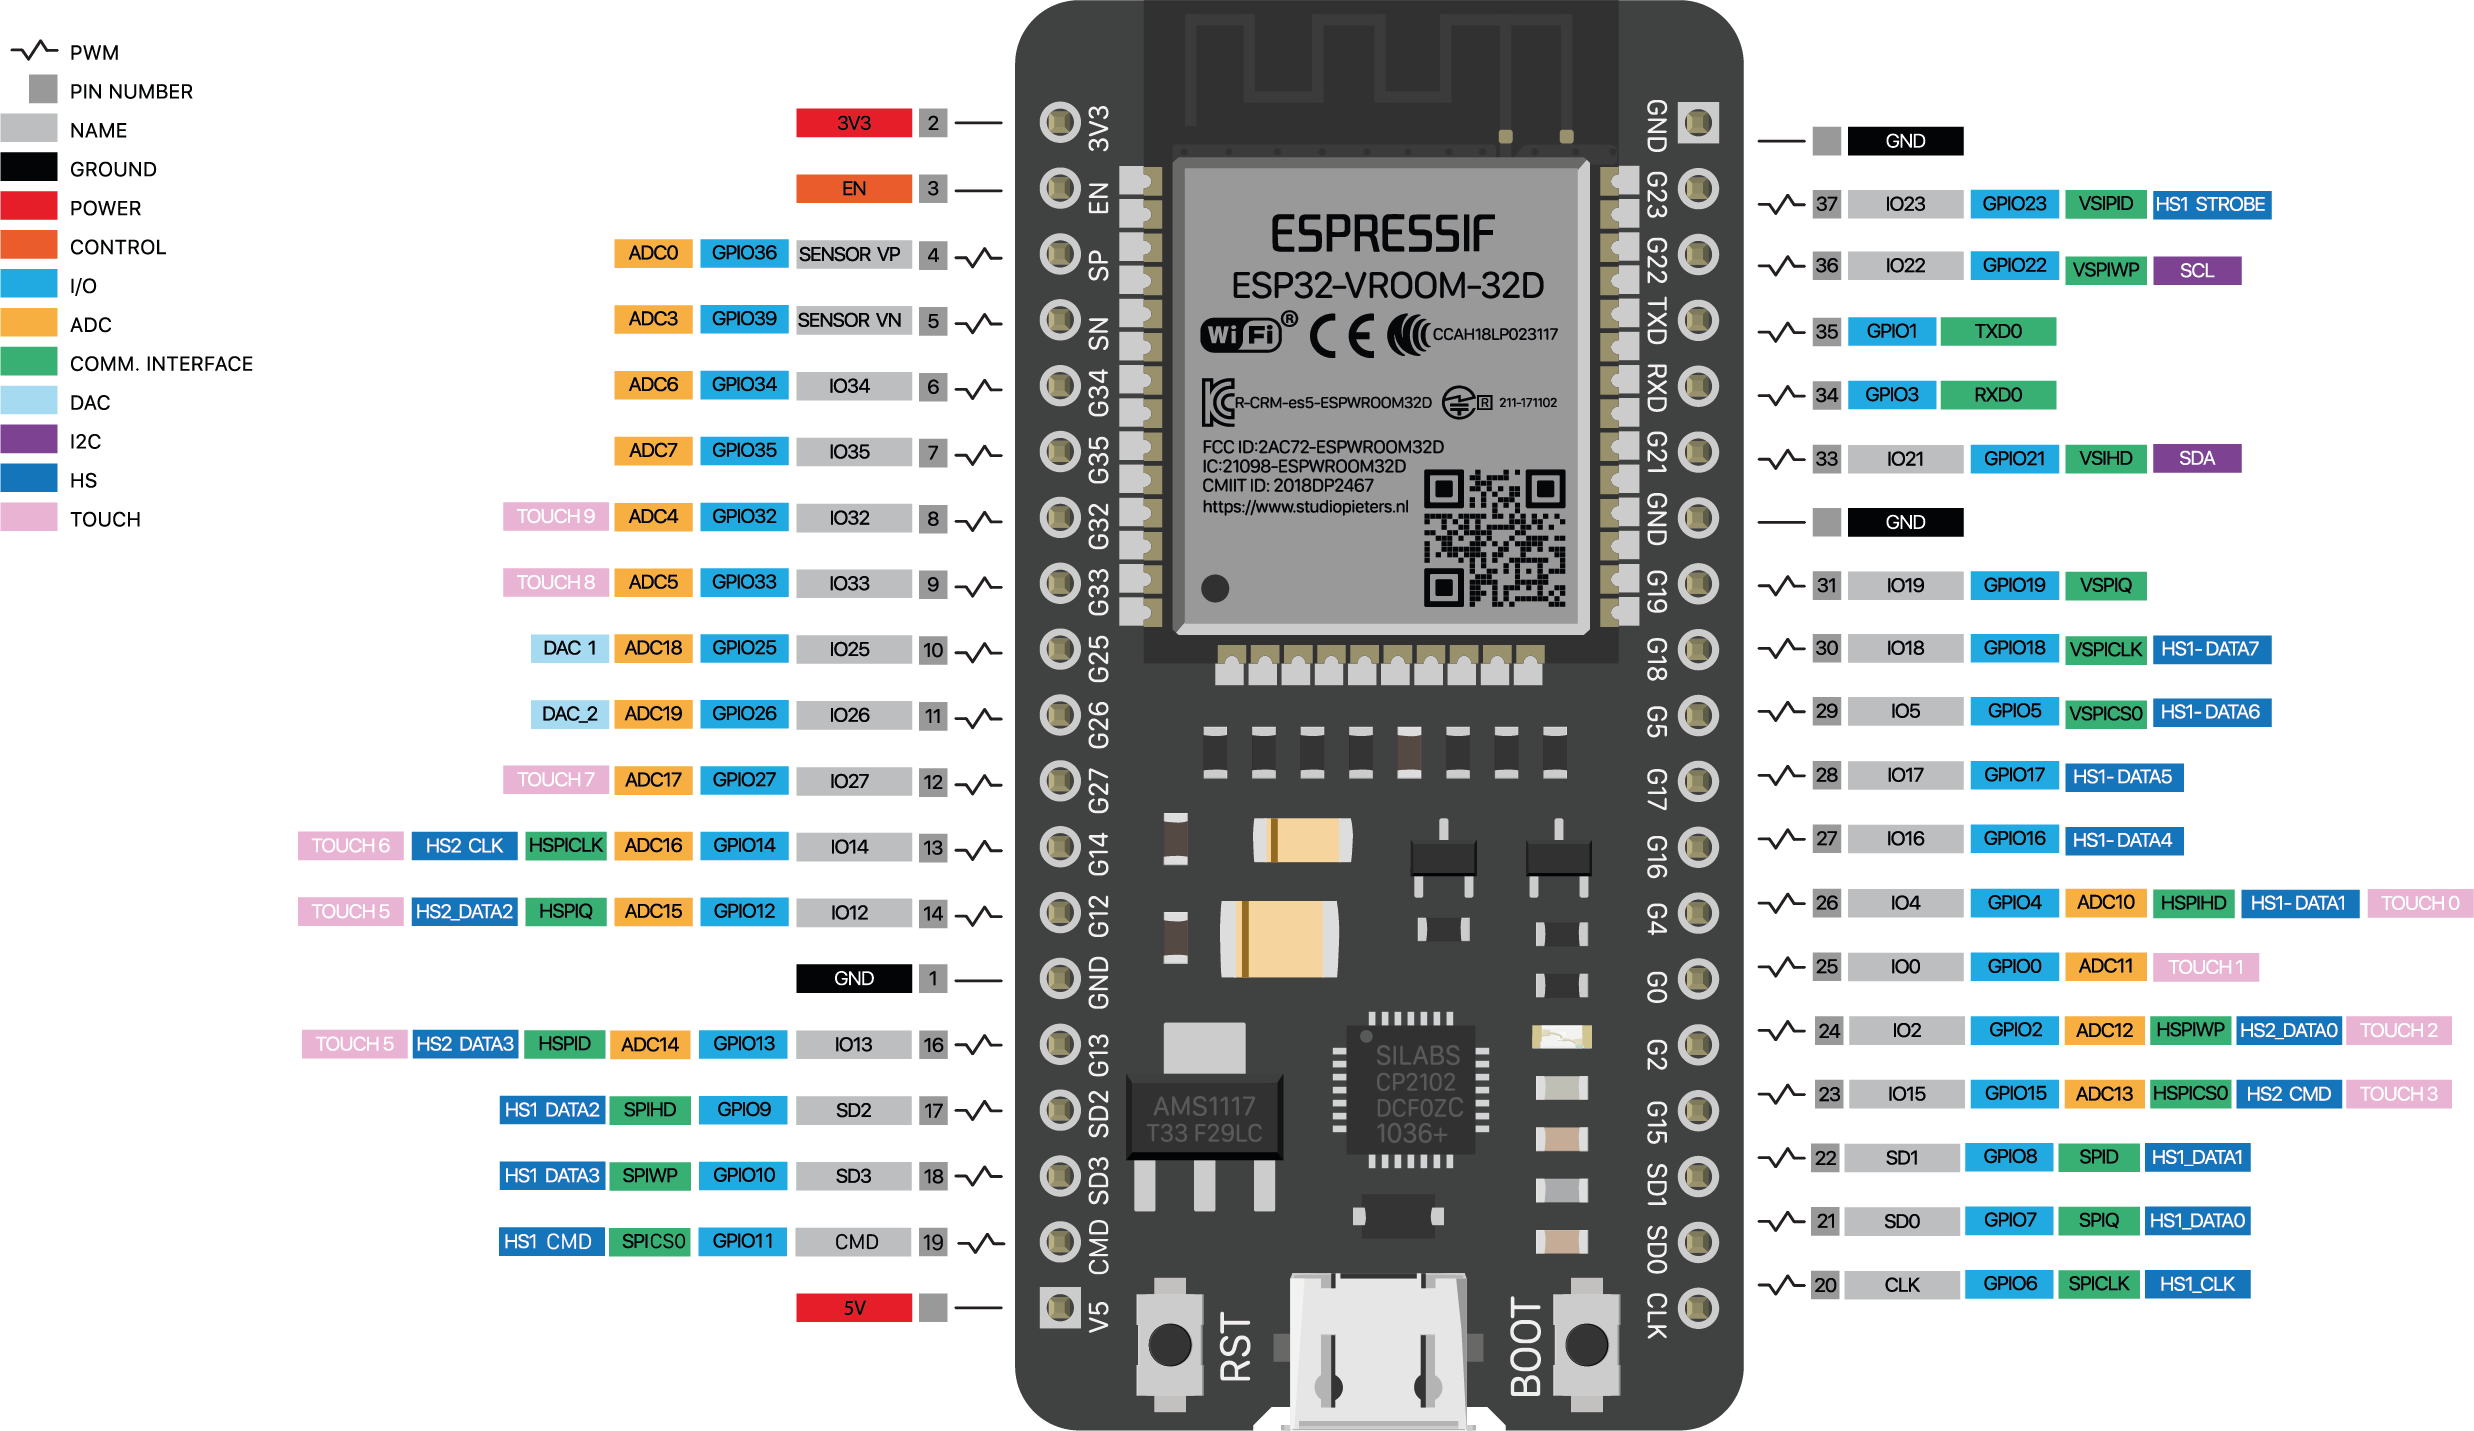
Bo mạch sử dụng là ESP32 WROOM có chân vào ra như trên hình.
Mục lục
Cấu hình ESP32
CPU
- CPU: Xtensa Dual-Core LX6 microprocessor.
- Chạy hệ 32 bit
- Tốc độ xử lý 160MHZ up to 240 MHz
- Tốc độ xung nhịp đọc flash chip 40mhz --> 80mhz (tùy chỉnh khi lập trình)
- RAM: 520 KByte SRAM
- 520 KB SRAM liền chip –(trong đó 8 KB RAM RTC tốc độ cao – 8 KB RAM RTC tốc độ thấp (dùng ở chế độ DeepSleep).
Hỗ trợ 2 giao tiếp không dây
- Wi-Fi: 802.11 b/g/n/e/i
- Bluetooth: v4.2 BR/EDR and BLE
Hỗ trợ tất cả các loại giao tiếp
- 8-bit DACs( digital to analog) 2 cổng
- Analog(ADC) 12-bit 16 cổng.
- I²C – 2 cổng
- UART – 3 cổng
- SPI – 3 cổng (1 cổng cho chip FLASH )
- I²S – 2 cổng
- SD card /SDIO/MMC host
- Slave (SDIO/SPI)
- Ethernet MAC interface with dedicated DMA and IEEE 1588 support
- CAN bus 2.0
- IR (TX/RX)
- Băm xung PWM (tất cả các chân )
- Ultra low power analog pre-amplifier’
Cảm biến tích hợp trên chip esp32
- 1 cảm biến Hall (cảm biến từ trường)
- 1 cảm biến đo nhiệt độ
- Cảm biến chạm (điện dung) với 10 đầu vào khác nhau.
Bảo mật
- IEEE 802.11 standard security features all supported, including WFA, WPA/WPA2 and WAPI
- Secure boot
- Flash encryption
- 1024-bit OTP, up to 768-bit for customers
- Cryptographic hardware acceleration: AES, SHA-2, RSA, elliptic curve cryptography (ECC), random number generator (RNG)
Nguồn điện hoạt động
- Nhiệt độ hoạt động -40 + 85C
- Điện áp hoạt động: 2.2-3.6V
- Số cổng GPIOs : 34
Đánh giá chung
ESP32 xứng đáng với sự mong mỏi ở các cải tiến trên esp8266.
Với esp8266, cùng với wifi , esp32 hỗ trợ thêm truyền nhận Bluetooth, RAM nhiều hơn, Tốc độ xử lý nhanh hơn, số chân GPIO nhiều hơn, nhiều cổng giao tiếp hơn, nhiều chân PWM hơn, nhiều chân ADC hơn, tích hợp cả 3 loại cảm biến (nhiệt độ, hall, touch sensor)… Quá tốt cho các ứng dụng!!!
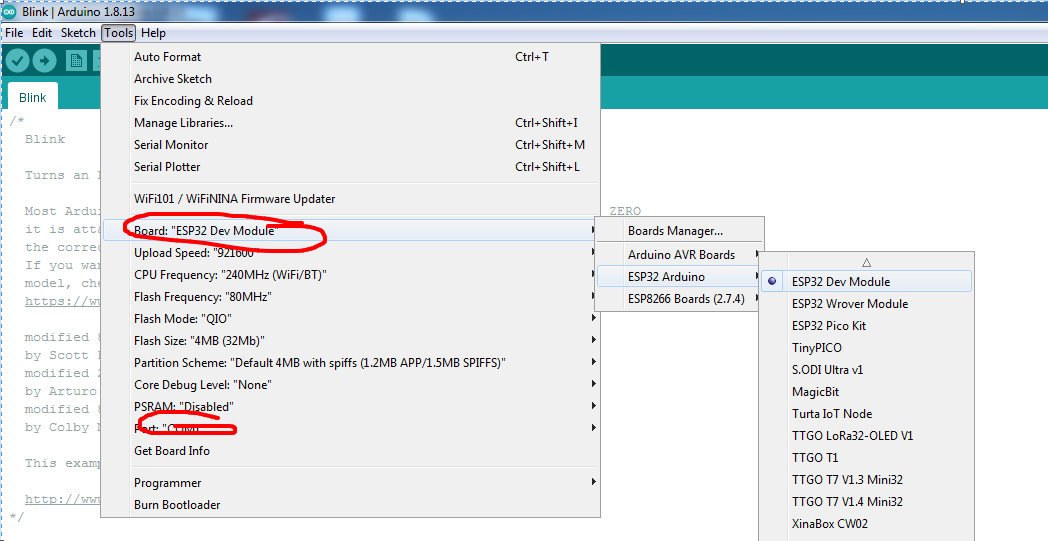
Cài đặt ESP32 trên Arduino IDE
Quá trình cài đặt ESP32 gần giống như quá trình cài đặt ESP8266. Để cài đặt ESP32 trên Arduino IDE, hãy làm theo các bước sau:
Bước đầu tiên: Tải các tập tin cần thiết từ các GitH ub
Tải xuống ESP32 Ard ui no Core từ tài khoản GitHub của nó . Bạn có thể sử dụng tải về trực tiếp liên kết cũng .
https://github.com/espressif/arduino-esp32/archive/master.zip
Bước thứ hai: Di chuyển tệp đến vị trí thư mục Arduino
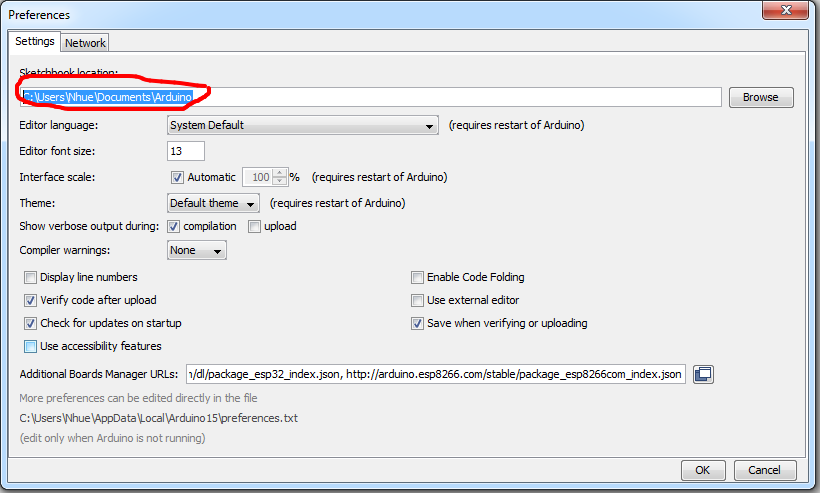
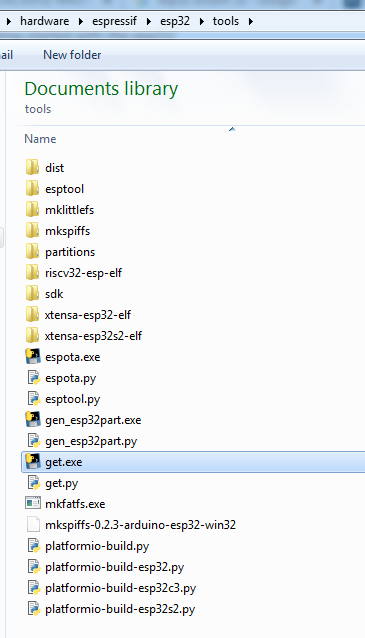
Tạo một thư mục có tên espressif bên trong thư mục hardware, sau đó tạo một thư mục khác có tên esp32 bên trong thư mục espressif. Cuối cùng, đường dẫn bạn tạo sẽ giống đường dẫn sau: C:\Users\Nhue\Documents\Arduino\hardware\espressif\esp32
Giải nén tệp bạn đã tải xuống ở bước trước và di chuyển tệp đó đến địa chỉ này.
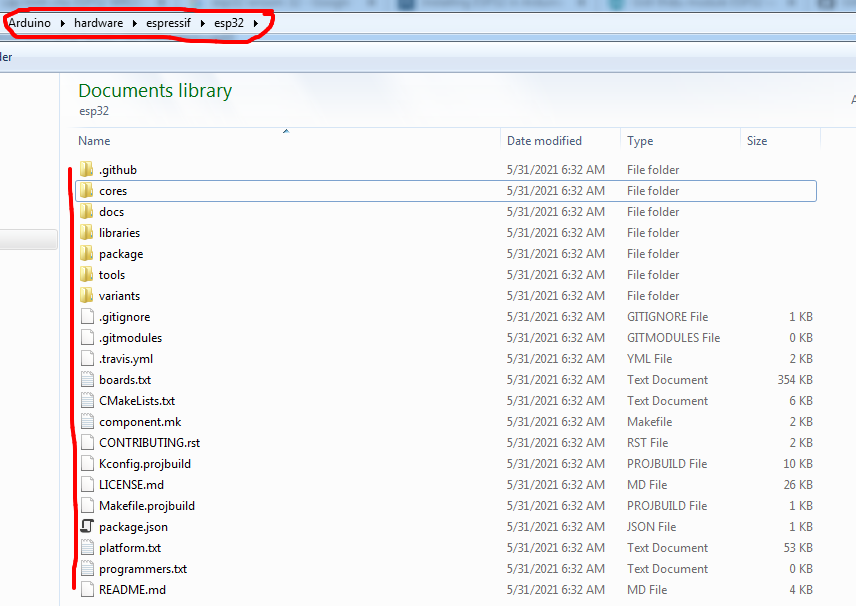
Bước thứ ba: Chạy get.exe
Để cài đặt ESP32 trên phần mềm Arduino, bạn cần cài đặt bộ sưu tập trình biên dịch Xtensa GNU trên hệ thống của mình. Đi tới esp32> tools và chạy tệp get.exe .

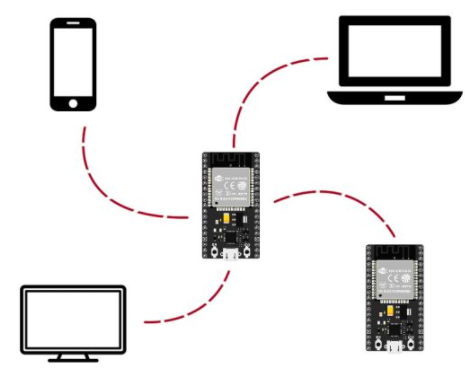
WEB server
Nội dung
- Làm quen với máy chủ web
- Tạo máy chủ web với ESP32
- Giới thiệu ngắn về các lệnh HTML và CSS
Thiết lập ESP32 ở Chế độ Trạm (STA)
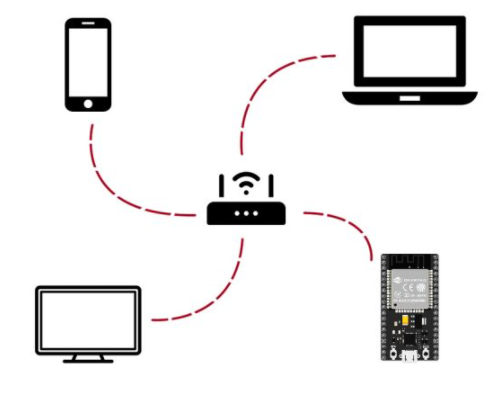
Trong trường hợp này, mô-đun ESP32 được kết nối với bộ định tuyến Wi-Fi dưới dạng Máy khách và có thể truy cập Internet thông qua bộ định tuyến.
#include <WiFi.h>
#include <WebServer.h>
// SSID & Password
const char* ssid = "Ali"; // Enter your SSID here
const char* password = "********"; //Enter your Password here
WebServer server(80); // Object of WebServer(HTTP port, 80 is defult)
void setup() {
Serial.begin(115200);
Serial.println("Try Connecting to ");
Serial.println(ssid);
// Connect to your wi-fi modem
WiFi.begin(ssid, password);
// Check wi-fi is connected to wi-fi network
while (WiFi.status() != WL_CONNECTED) {
delay(1000);
Serial.print(".");
}
Serial.println("");
Serial.println("WiFi connected successfully");
Serial.print("Got IP: ");
Serial.println(WiFi.localIP()); //Show ESP32 IP on serial
server.on("/", handle_root);
server.begin();
Serial.println("HTTP server started");
delay(100);
}
void loop() {
server.handleClient();
}
// HTML & CSS
String HTML = "<!DOCTYPE html>\
<html>\
<body>\
<h1>Here => Web Server with ESP32 - Station Mode 😊</h1>\
</body>\
</html>";
// Handle root url (/)
void handle_root() {
server.send(200, "text/html", HTML);
}
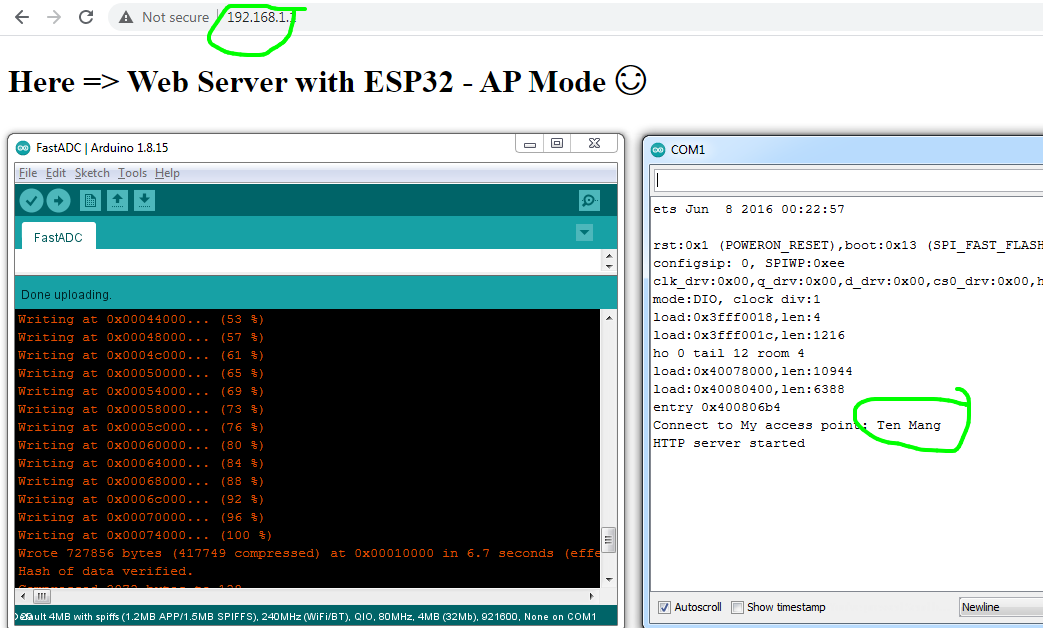
Thiết lập ESP32 ở Chế độ điểm truy cập (AP)
Trong trường hợp này, ESP32 hoạt động như một bộ định tuyến và tạo ra một mạng wifi cục bộ với tên và mật khẩu mong muốn. Vì có một số lượng hạn chế thiết bị có thể kết nối với điểm kết nối này, nó còn được gọi là Điểm truy cập mềm.
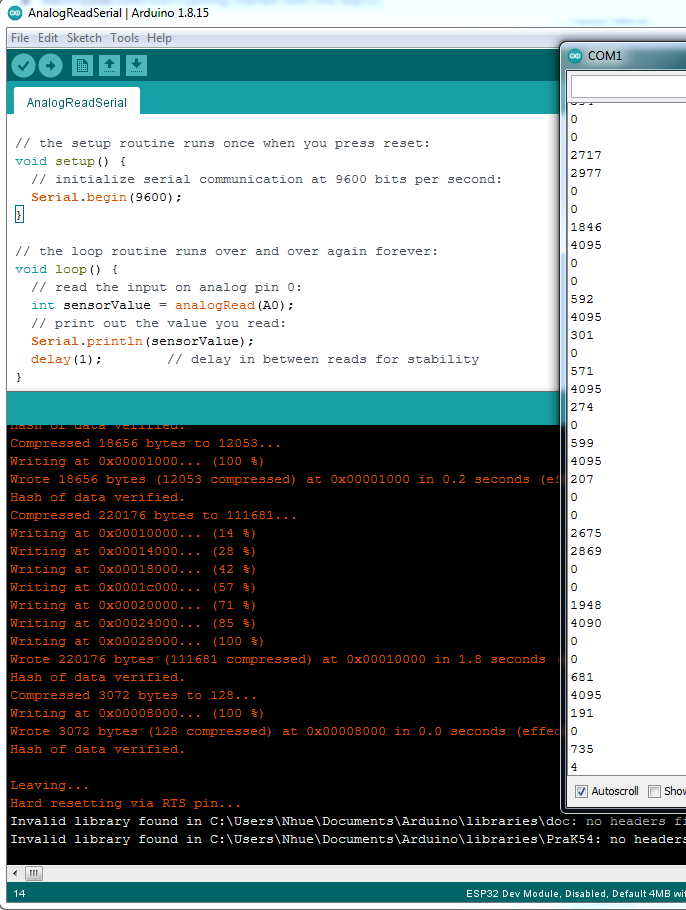
Lập trình đọc ADC nhanh
#include <WiFi.h>
#include <WebServer.h>
// SSID & Password
const char* ssid = "Ten Mang"; // Enter your SSID here
const char* password = "MatKhauMang"; //Enter your Password here
// IP Address details
IPAddress local_ip(192, 168, 1, 1);
IPAddress gateway(192, 168, 1, 1);
IPAddress subnet(255, 255, 255, 0);
WebServer server(80); // Object of WebServer(HTTP port, 80 is defult)
void setup() {
Serial.begin(115200);
// Create SoftAP
WiFi.softAP(ssid, password);
WiFi.softAPConfig(local_ip, gateway, subnet);
Serial.print("Connect to My access point: ");
Serial.println(ssid);
server.on("/", handle_root);
server.begin();
Serial.println("HTTP server started");
delay(100);
}
void loop() {
server.handleClient();
}
// HTML & CSS contents which display on web server
String HTML = "<!DOCTYPE html>\
<html>\
<body>\
<h1>Here => Web Server with ESP32 - AP Mode 😊</h1>\
</body>\
</html>";
// Handle root url (/)
void handle_root() {
server.send(200, "text/html", HTML);
}
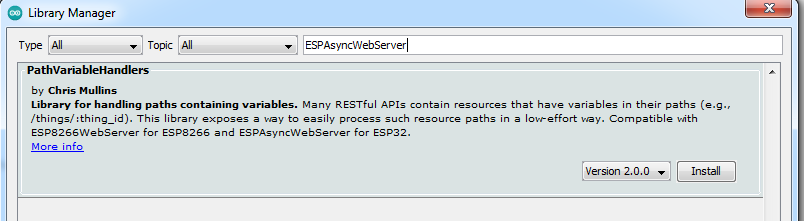
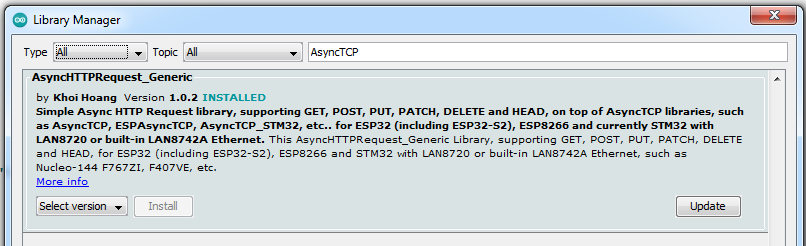
WEB socket with ESP32
Cài thư viện:
#include <WiFi.h>
#include <AsyncTCP.h>
#include <ESPAsyncWebServer.h>

// Replace with your network credentials
const char* ssid = "Ali";
const char* password = "******";

bool ledState = 0;
const int ledPin = 2;

// Create AsyncWebServer object on port 80
AsyncWebServer server(80);
AsyncWebSocket ws("/ws");

const char index_html[] PROGMEM = R"rawliteral(
<!DOCTYPE HTML><html>
<head>
  <title>ESP Web Server</title>
  <meta name="viewport" content="width=device-width, initial-scale=1">
  <link rel="icon" href="data:,">
  <style>
  html {
    font-family: Arial, Helvetica, sans-serif;
    text-align: center;
  }
  h1 {
    font-size: 1.8rem;
    color: white;
  }
  h2{
    font-size: 1.5rem;
    font-weight: bold;
    color: #143642;
  }
  .topnav {
    overflow: hidden;
    background-color: #143642;
  }
  body {
    margin: 0;
  }
  .content {
    padding: 30px;
    max-width: 600px;
    margin: 0 auto;
  }
  .card {
    background-color: #F8F7F9;;
    box-shadow: 2px 2px 12px 1px rgba(140,140,140,.5);
    padding-top:10px;
    padding-bottom:20px;
  }
  .button {
    padding: 15px 50px;
    font-size: 24px;
    text-align: center;
    outline: none;
    color: #fff;
    background-color: #0f8b8d;
    border: none;
    border-radius: 5px;
    -webkit-touch-callout: none;
    -webkit-user-select: none;
    -khtml-user-select: none;
    -moz-user-select: none;
    -ms-user-select: none;
    user-select: none;
    -webkit-tap-highlight-color: rgba(0,0,0,0);
   }
   /*.button:hover {background-color: #0f8b8d}*/
   .button:active {
     background-color: #0f8b8d;
     box-shadow: 2 2px #CDCDCD;
     transform: translateY(2px);
   }
   .state {
     font-size: 1.5rem;
     color:#8c8c8c;
     font-weight: bold;
   }
  </style>
<title>ESP Web Server</title>
<meta name="viewport" content="width=device-width, initial-scale=1">
<link rel="icon" href="data:,">
</head>
<body>
  <div class="topnav">
    <h1>ESP WebSocket Server</h1>
  </div>
  <div class="content">
    <div class="card">
      <h2>Output - GPIO 2</h2>
      <p class="state">state: <span id="state">%STATE%</span></p>
      <p><button id="button" class="button">Toggle</button></p>
    </div>
  </div>
<script>
  var gateway = `ws://${window.location.hostname}/ws`;
  var websocket;
  window.addEventListener('load', onLoad);
  function initWebSocket() {
    console.log('Trying to open a WebSocket connection...');
    websocket = new WebSocket(gateway);
    websocket.onopen    = onOpen;
    websocket.onclose   = onClose;
    websocket.onmessage = onMessage; // <-- add this line
  }
  function onOpen(event) {
    console.log('Connection opened');
  }
  function onClose(event) {
    console.log('Connection closed');
    setTimeout(initWebSocket, 2000);
  }
  function onMessage(event) {
    var state;
    if (event.data == "1"){
      state = "ON";
    }
    else{
      state = "OFF";
    }
    document.getElementById('state').innerHTML = state;
  }
  function onLoad(event) {
    initWebSocket();
    initButton();
  }
  function initButton() {
    document.getElementById('button').addEventListener('click', toggle);
  }
  function toggle(){
    websocket.send('toggle');
  }
</script>
</body>
</html>
)rawliteral";

void notifyClients() {
  ws.textAll(String(ledState));
}

void handleWebSocketMessage(void *arg, uint8_t *data, size_t len) {
  AwsFrameInfo *info = (AwsFrameInfo*)arg;
  if (info->final && info->index == 0 && info->len == len && info->opcode == WS_TEXT) {
    data[len] = 0;
    if (strcmp((char*)data, "toggle") == 0) {
      ledState = !ledState;
      notifyClients();
    }
  }
}

void onEvent(AsyncWebSocket *server, AsyncWebSocketClient *client, AwsEventType type,
             void *arg, uint8_t *data, size_t len) {
  switch (type) {
    case WS_EVT_CONNECT:
      Serial.printf("WebSocket client #%u connected from %s\n", client->id(), client->remoteIP().toString().c_str());
      break;
    case WS_EVT_DISCONNECT:
      Serial.printf("WebSocket client #%u disconnected\n", client->id());
      break;
    case WS_EVT_DATA:
      handleWebSocketMessage(arg, data, len);
      break;
    case WS_EVT_PONG:
    case WS_EVT_ERROR:
      break;
  }
}

void initWebSocket() {
  ws.onEvent(onEvent);
  server.addHandler(&ws);
}

String processor(const String& var){
  Serial.println(var);
  if(var == "STATE"){
    if (ledState){
      return "ON";
    }
    else{
      return "OFF";
    }
  }
}

void setup(){
  // Serial port for debugging purposes
  Serial.begin(115200);

  pinMode(ledPin, OUTPUT);
  digitalWrite(ledPin, LOW);

  // Connect to Wi-Fi
  WiFi.begin(ssid, password);
  while (WiFi.status() != WL_CONNECTED) {
    delay(1000);
    Serial.println("Connecting to WiFi..");
  }

  // Print ESP Local IP Address
  Serial.println(WiFi.localIP());

  initWebSocket();

  // Route for root / web page
  server.on("/", HTTP_GET, [](AsyncWebServerRequest *request){
    request->send_P(200, "text/html", index_html, processor);
  });

  // Start server
  server.begin();
}

void loop() {
  ws.cleanupClients();
  digitalWrite(ledPin, ledState);
}
Kết quả hoạt động của mã

Bình luận gần đây